 |
 |
 |

This guide is put together to help you design your very own make-able latex weapon. It covers the basics of the areas of a sword and what you can do with them whilst drawing them up. It's also of the assumption that you've had inspiration from the vast amount of influence material out there. First of all you need to understand the different areas of a sword and what they’re called. |
AREAS OF A SWORD |
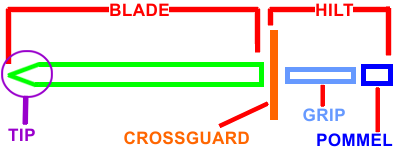
When people talk about the areas of a sword, its generally broken down into two areas: the blade and the hilt.
The Hilt has aspects to it of the pommel; grip; crossguard and these elements can be changed for your design, which we will look at later in this guide. The Blade is the striking area of a sword and is something that can be radically changed to suit each design or flavour of a sword. It also has other elements to it which will be explored later. |
DRAW YOUR DESIGN ON A LINE |
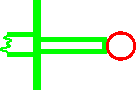
When designing a sword its important to remember that the sword is built around a straight core and so all the sword elements have to fit around it. |
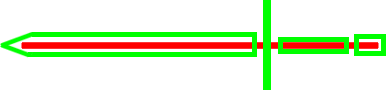
Red line represents a line drawn on a page
The best way to do this, is to draw a straight line on a page before drawing anything else, then drawing the sword over it. That way you will instantly know if its a makeable design or not. |
ELEMENTS OF A BLADE |
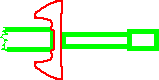
| SWORD TIPS |
A. Single Angle Edged Tip |
B. Double Angle Edged Tip |
C. Single Rounded Edge Tip |
D. Double Rounded Edge Tip |
E. No Tip |
These are the most common tip designs. You will find most double sided blades will have the double angled or double rounded tips as the blade edges follow though. In turn the single edged blades will follow to a single angle or rounded tip. Cleaver weapon types generally dont have a tip, so they have a flat end.
Whether you choose if tips are rounded or straight angled is entirely down to your own preference and doesnt hinder the use of the sword.
|
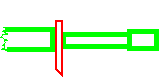
| THE FULLER |
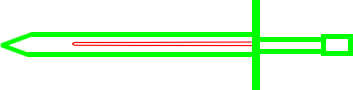
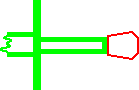
The Fuller (illustrated here in red) is featured in lots of swords. The fuller is mainly there in real weapons for two reasons: to lighten the blade so its more easily wielded; to strengthen the blade in the blacksmithing process.
On a latex weapon, the Fuller only really serves in an aesthetic way, so it isnt necessary to have one.
If you want a weapon to look blacksmithed, its a good idea to include this. Otherwise its down to you!
|
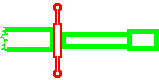
| THE CHAPPE (RAIN GUARD) |
 |
 |
 |
For obvious reasons and because were pretty immature, we like a nice Chappe. The Chappe is actually there for swords which are normally put into a protective sheath when not being used. The Chappe is there to bridge the gap in the sheath entrance, to stop rain from getting in and rusting the blade.
For latex weapons, it doesnt have this purpose. Instead you can use this element as an awesome excuse for adding all kinds of shapes and details.
|
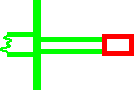
| THE RICASSO |
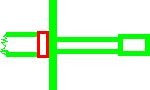
The Ricasso was originally on swords from the medieval / renaissance times as it allowed the wielder better control of the weapon. In latex weapon terms this is an epic part of a sword which you can do loads with to make it look cool.
You can serrate the edge to make it look mean; you can add spikes for that extra nastiness; you can have it there and just keep it plain for an additional visual element of the weapon. Whatever its used for, its a great part of a sword.
|
THE HILT |
| THE CROSSGUARD |
 |
 |
 |
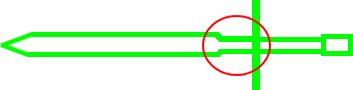
A crossguard can change everything about a sword. Whether its small and simple or large and extravagant, the crossguard can really control the flavour of the sword. This is where research, creative magic or good planning can really make the difference.
Alternatively you could go the other way. The most aggressive weapons are considered to have no crossguard as you dont expect to defend, only attack. Often self-made swords dont have a crossguard in favour of showing off riveted plates or crude bindings.
|
| HAND GUARD |

Some swords look for a little bit more protection for the hand and so have a handguard (or sometimes referred to as a bucket hilt). They are often seen on period military swords and characters of a more noble standing. They also offer an additional way of blocking, giving the full length of a sword as a parrying surface. However to adopt this as your normal swordplay can be a little bad as when you use a different sword without the guard, you may find yourself with stingy fingers. |
| GRIP |
Standard Binding |
Cross-Bound |
Random-Bound |
Multi-Binding |
Good grips have a leather wrap which are bound into place. Hack and Slash ones certainly do! And this is where weapon making moves away from real life weapons. Its an opportunity to add additional detail to a sword to help give it flavour.
Standard Binding is great if you dont want to detract from the main body of the weapon. If its a relatively simple design, doing anything else could be too much detail. Cross-Binding in an excellent way to fake a look of martial artistry or give the sword a bit of bite to it. Random-Binding is the ultimate bad guy grip. The randomness show almost like, a professional evil element or a lack of caring. Multi-Binding is something rarely used. Its a great way of adding even more detail, effortlessly to a sword to make it even more cool. |
| POMMEL |
 |
 |
 |
The pommel is the final part of the design process to put the icing on the cake. Its usually best to echo the flavour or the swords crossguard onto the pommel so it has continuity of design.
Its best to avoid a spiked bottom to them as this can present a weak point of the sword. If youre putting a sword down, pommel first, to preserve the stabby end, a spike at the bottom will equally get destroyed just as quick.
|
TRY IT YOURSELF |
Thats about it for the sword design basics. Hopefully youve learned something from this tutorial and its been informative. Best thing you can do now is put a pencil to a page, remember or refer to this guide and draw whats in your minds eye! |